Fortunately, we did not sustain any damage at our house - only a few fallen branches. There was a hornet's nest that ended up in our backyard. Carlos said he would take care of it by stepping on the nest. Tuna and I protested through a chorus of shrieks, so Carlos decided to grab a couple of plastic bags and "capture" the nest. YIKES!!!! Tuna and I watched safely from the window :)
(I know it's not a good picture, but I did not want to get too close to this. We saw about 8 baby hornets flying around)
Wednesday, August 31, 2011
Hurricane Irene
The next few blogs will be about our experience with Hurricane Irene. Even though there was so much damage, we are so thankful for many things. First and foremost - we had water!!! Water - toilet, cold showers, dishes, cooking. We did have 15 gallons of water ready before I found out that we had city water and I guess the city had generators for the water. YAY!!! We fared better than many people! I was very thankful for my texting friends - Josiah, Sarah, Lauren and Megan. I felt "in touch" with people for the first couple of days after the hurricane - and it was good for my sanity! Another thing that I was thankful for was awesome family time. I had such a good time with the girls. We worked together during this "crisis" and everything went very smooth.
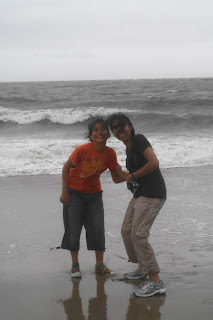
The following pictures were taken at Ocean Beach on Sunday afternoon - about 3pm. I would like to note that the pictures were auto enhanced because they were extremely grey. It was a very grey day on Sunday. The sky was not blue at all. I wanted you to see the magnitude of the crashing waves. :)
You can see how windy it was by Tuna's shirt (orange).
Tuna played tag with the ocean...
...and lost.
I was trying to get pictures of the girls with the waves behind them, but Gabbie was a little apprehensive.
Dedee
The following pictures were taken at Ocean Beach on Sunday afternoon - about 3pm. I would like to note that the pictures were auto enhanced because they were extremely grey. It was a very grey day on Sunday. The sky was not blue at all. I wanted you to see the magnitude of the crashing waves. :)
You can see how windy it was by Tuna's shirt (orange).
Tuna played tag with the ocean...
...and lost.
I was trying to get pictures of the girls with the waves behind them, but Gabbie was a little apprehensive.
Saturday, August 27, 2011
Josiah's 18th birthday celebration!!!!

We had a blast at the Jones' house on Thursday!! We celebrated Josiah's 18th birthday. Josiah got a range of gifts - from money to food and a MACHETE (with bandaids, of course) :) It was a great time sitting around the fire, singing (not Kumbaya, LMN), chatting and playing.


Thursday, August 25, 2011
Rolo Cake Mix Cookies
I saw this recipe on the blog "Buns In My Oven". I like Rolos and I like chocolate - so why not combine them!!!
Here is the recipe:
Ingredients:
1 box Devil's Food cake mix
2 eggs
1/3 cups oil
bag of Rolo candies, unwrapped
Instructions:
1. Preheat oven to 350 degrees. Line cookie sheet with parchment ***I didn't have any parchment, so I skipped that step***
2. Mix together the first three ingredients. Grab a small piece of dough (about half the size of a golf ball) ***I used a small Pampered Chef cookie scooper***
Roll the dough into a ball. Smoosh it flat.
Place a Rolo in the center, and then close the dough around the Rolo. Repeat until all of the dough is used.
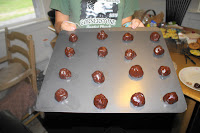
****My little side note - My dough didn't seem big enough, it ripped when I placed it around the Rolo. Once I put the dough around the Rolo, I rolled it into a ball. The whole Rolo was covered with dough.
Bake for about 9 minutes.
Sprinkle with powdered sugar.
YUUUUUMMMM!!!!!
****EXTREMELY HOT WHEN COOKIE COMES OUT OF THE OVEN*****
Funny note...I tried to get a picture of Gabbie eating the cookie - you know, the carmel oozing out of the cookie. Apparently, we didn't wait long enough for the cookie to cool. Poor Gab ended up burning her mouth, she then dropped her cookie on the floor and ran to the sink to wash her fingers. The whole time she was telling me that the cookie was super hot. I grabbed the camera - thinking this would be great blogging material. Can you believe it?? She would NOT let me take a picture of her finger for the blog!!! HMPH!!! So we waited a bit, I grabbed a cookie and opened it up and told Gab that it wasn't hot (which it wasn't) so she could hold it for the picture. Well, apparently my daughter has sensitive fingers...she threw down the cookie, proclaimed that the cookie was hot and that she hated these cookies!! (Can I just say that I'm chuckling while I'm writing this ☺). Too funny!!!
Wednesday, August 24, 2011
No Carb, Gluten-Free Pasta
I love kitchen gadgets. I could spend hours on end at the Grey Goose in Mystic just looking around. I love imaging my very large kitchen with all of these gadgets and gizmos all over the place - aaaahhhhh...heaven on earth!!!! My newest toy is a Saladacco Spiral Slicer. Wow - BIG FUN!!!!!
Yesterday I used it to make some zucchini pasta - YUM!!! Maybe you don't think it sounds appetizing - but rest assured, it is. Once you add the sauce to the "pasta", you can't tell the difference. Believe me, Tuna is the Pasta Queen of the World!!!! She could eat pasta morning, noon, and night!.
Let me tell you about this little gizmo. It makes spirals or long angel hair strands of your favorite veggie.
The Saladacco is so easy to use. Cut the vegetable into 5" pieces, put it in the Saladacco, and then turn. That's it - EASY!!!
Add a little sauce and VOILA -
ZUCCHINI PASTA!!!
Dedee
DISGUSTINGNESS
Disgustingness is a Gabbieism which means something that is totally, 100%, beyond human understanding - DISGUSTING!! You ask what could be so disgusting?? Look below....
Yup, it an arachnid...aka, SPIDER!!! Tuna grabbed some grapes from the fridge (she didn't wash them, mind you - like I told her), put them on the table and screamed. Once I ascertained that there really was a spider, I ran over to look at the grapes, freaked out - and then grabbed the camera :)
I just couldn't eat a single grape. I don't think I will ever be able to eat grapes again - unless someone takes them off the stem for me....BLECH!!!!!
Dedee
Can you see it????
Not yet????
Yup, it an arachnid...aka, SPIDER!!! Tuna grabbed some grapes from the fridge (she didn't wash them, mind you - like I told her), put them on the table and screamed. Once I ascertained that there really was a spider, I ran over to look at the grapes, freaked out - and then grabbed the camera :)
I just couldn't eat a single grape. I don't think I will ever be able to eat grapes again - unless someone takes them off the stem for me....BLECH!!!!!
Dedee
My dear friend Laura is having a baby. I'm so incredibly excited for her!!!!! Unfortunately, she's having a hard time finding modest maternity clothes that don't cost a gazillion bucks! I have been looking at second hand stores to see what was out there. After looking around, I didn't think it wouldn't be hard to make a maternity skirt out of a regular skirt. I went home and did some research.
I googled "making maternity skirt out of regular skirt". Believe it or not, many websites came up. The easiest one I found used an old skirt and t-shirt. I went back to my favorite place to shop - GW Fashions - and bought some skirts and t-shirts.
Here are the directions. It's pretty easy!!! :)
First, I layed out the skirt. Then I folded it in half - side seam to side seam. I measured down about 8" and used a bowl to make the curve for the tummy and then went straight up to the top of the skirt instead of following the bowl.
Easy, right?? ****Side note - if you are observant, you will notice the first skirt is green and the second skirt is khaki. Well, being the genius that I am, I cut through all the layers of the khaki skirt (which was originally the first skirt). Now the khaki skirt looks like a jumper. I will post a picture at the end of the blog :p ******
Cut out the the belly area. ***UGH, another side note. The wet is from my pencil markings. I erased them and then I wet it down. I couldn't find chalk or my invisible pen :( *********
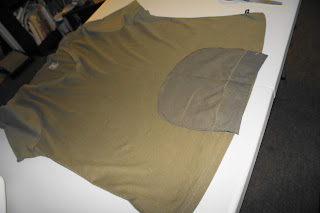
Lay out the t-shirt. You're going to use the bottom of the shirt. Take the piece that you cut of the skirt and lay it at the bottom of the shirt. Make sure the hem of the shirt and the top of the skirt are together. Trace the skirt piece onto the shirt. Cut the shirt.
This skirt had a lining, so I zig zagged the lining and the skirt together.
Pin the right sides together and sew!! :)
There it is. A maternity skirt made from a t-shirt and a regular skirt. Hopefully, it will do the trick ;)
Subscribe to:
Comments (Atom)


